
Author: BluBerrey
How to Make Settlement Maps: For Beginners (Part 1: Pen and Paper)
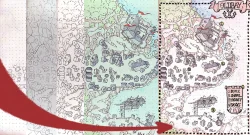
Introduction Creating town maps can be a fun and rewarding process that adds richness to your fantasy realm. This is the first of a series of how to make settlement maps, that will go from simple pen-and-paper approaches to more advanced methods. Let’s begin with the basics of hand-drawn maps and bring your towns to life! Whether you’re a game master seeking to improve your campaign or a writer looking to picture your setting, making maps can be quite satisfying. Of course there are many other methods and mediums you can use, but starting with the humble ‘pencil on paper’ is a great way to begin your mapmaking journey! Better yet, if you only used digital methods before, it is really satisfying to have a phisical manifestation in your hands and maybe even frame and hang on a wall. (If you are happy enough with the final result, of course!) Materials Pen and Paper Gather your materials before you start drawing. Below is a list of what you’ll need: pencils and erasers for sketching (and a ruler if you want to be precise or draw grids), graph or plain paper (depending on your preferences), fine-tip pens for inking and finishing, colored pencils or markers for extra detailing. Other Ideas You could also use any other medium you’d prefer. I personally really enjoy sketching my maps with pencil and then finishing them using watercolor paint. If you are an absolute beginner, I’d advise you to stick to just a pencil and a fine-tip pen. If you feel comfortable however, you are welcome to splash any other materials onto your maps, be that crayons, watercolor, or if you are particularly fancy; oil paints. The limit is only your imagination (and vallet)! Explore different methods and find what works best for your needs and what you enjoy working with the most! I’ll use a notebook I had laying around, a pencil and a fine-point marker pen. For finishing touches I’ll use some shading brushes and coloring pencils. Getting Started Get Comfortable Find a comfy workspace with adequate lighting. Keep any reference materials nearby, such as books, images, or maps, to serve as inspiration. (Plus, this Step-by-Step Guide) Decide on your Viewpoint Most city maps (and maps in general) will be in a top down, flattened 2d view. This is highly recommended for beginners. Most roofs will become some form of a rectangle or circle from this view. This will make drawing your buildings really easy. In the future we will cover other perspectives and methods such as isometric, ‘bird’s eye’ and side view maps (many medieval city maps were done using this). But for now, top-down is all you will need! Plan Your Layout Start by envisioning the type of settlement you wish to build. Is it a bustling city, a quaint village, or a walled settlement? Consider its purpose, location, orientation and neighboring natural resources. Sketch a basic outline of the settlement’s limits, taking into account any physical features such as rivers, hills, or forests. No need to be accurate here, rectangles and generic ‘blobs’ will do just fine! In my case for this example, I’m going for a small village with a castle on it’s shoreline and a dock area. I will also add a simple market square and a chapel. I want the castle to sit on top of a cliff, with the village around it, so I’ll need to keep my docks further down, close to the water. The docks will be connected with a serpentine leading up to the village and the castle. Using Symbols and Icons Create a set of symbols and icons to represent the various aspects in your map. Trees, mountains, roads, fields and houses are some examples of standard symbols. Consistent use of these makes your map easier to read. This will largely come down to your specific style and reference that you are following. Sketch of Layout complete. Areas arranged for the village, castle and docks. Sketched in main roads also. Sketching in the important bits Main Buildings and Areas First off, erase your sketch ‘blobs’ until just faint lines remain that you can follow. Begin by drawing the key elements of your settlement. This covers key structures including the town hall, market plaza, and any noteworthy landmarks. Place these pieces deliberately to reflect the organization and culture of your community. For example, a medieval town could include a central castle surrounded by residences and farmland. While a religious fanatical society might have a massive temple or cathedral in the center. Consider how these structures interact with one another and the community as a whole. To give you some ideas, here are a few noteworthy locations we could think of, separated into more ‘classical’, historical sites, and fantasy locations: Historical Locations: Cathedral, Castle, Marketplace, Town Hall, Library, Palace, Barracks, Guild Hall, University, Harbor, Town Square, Clock Tower, Blacksmith Forge, Guard Station, Cemetery Fantasy Locations: Enchanted Forest, Dragon’s Lair, Wizard’s Tower, Treehouse Village, Magic Academy, Oracle’s Sanctuary, Crystal Cavern, Mystic Waterfall, Sorcerer’s Workshop, Floating Citadel, Arcane Library, Haunted Ruins, Griffon Stables, Goblin Market, Rune-Stone Circle The castle, chapel, market and dock area sketched down. Small houses You can of course draw all houses individually if you whish. However, if you are working on a big city like a capital, I’d advise drawing blocks or zones. It takes a long time to draw each individual house. Only do it if you want the look, functionality and level of detail you can get from doing that! In this case, I drew them, since I’m only creating a small village. You can use our assets as reference for this, if you enjoy the BluBerreyMaps style! Roads and pathways Roads are essential in any settlement. Draw the main routes first, connecting important buildings and entrances. Then, build smaller pathways and alleyways to form a network that residents and visitors can use. Consider how natural elements shape the placement of these highways. If your settlement sits on some form of elevation, add staircases and serpentines. You can also ignore drawing roads between buildings, and just suggest these by the placement of your buildings. Natural Features Include natural components like rivers, forests, and hills on your map. These features enhance the settlement’s aesthetics while also influencing its layout and economy. For example, a river may give water and trade routes, whereas trees provide resources and protection. The resources available and the wealth of your settlements will also determine what your buildings will be made out of. You can showcase this in your map using details. Smaller Houses cliffaces and trees/forests drawn in. Inking and Details Linework If you want to give a finalized, clean look to your map you can lightly erase your pencil marks and draw over them using a fine-point marker or ballpoint pen (or any other ‘inking’ tool of your choice!). In my experience a dark pencil works great here too. You can also ignore this step and leave your map as is. Depends on how you want to present your map. Do you just need it for your writing to keep in mind where everything is and distances between places? Great, leave it as a sketch, you are done! Do you want to put something great looking in front of your players on that special upcoming DnD session? Fantastic, carry on with adding inking, small touches of detail and color! I’ve rarely come across a player who doesn’t appreciate a pretty map. Another tip is that after ink is down, try to use an eraser on top of it again. (Some inks can smudge, if yours does, stop here). Push the eraser down a bit harder (mind not wrinkling the paper), and remove all of the pencil marks. This is what I did too! Erased pencil and redrawn using fine-point marker. Shadows for Depth and/or Color Shading provides the illusion of depth and dimension to your map. Use your pencil to lightly shade parts, adding elevation and texture. This makes buildings, roads, and natural elements stand out more prominently. (At this point you can also use very light and diluted inks or paints to quickly shade under your buildings. A dark purple pencil can also work great for this. Just tilt it to it’s side and use it with a very light touch! You can also shade one side of your roofs, which will give a great 3d effect to your map, while requiring very little work. I also find it very teraputic at times. If you use a dark shading pencil I’d recommend to avoid coloring on top it can look really muddy. Either color with 2 shades for each color, or just color flat using 1 shade, ignoring shadows. In my example, I’ve used a grey illustrator brush for the roofs and a light brown for the cliffs. You can get the same effect using any diluted grey paint or ink. I then added some color to the trees just using a green coloring pencil, some blue for the water and as final touch, red for the banners. With all those details colors and shadows done, I called this section completed! Inking and a splash of color! Including Labels and Names Add labels to name important areas and characteristics. Labeling can provide character to your map and assist to tell the story of your settlement. Use imaginative naming to reflect the culture and history of your fictional realm. Look up some font or refer to other maps to see how others lettered their naming! The choice of fonts can really sell the mood of your map. Check out the references below: On the left a more noble, classical codex looking text, while on the right, a pointy, sharp, and elongated font can give an evil and dangerous feel! You can also use naming tables. This is what I did in the example map. Doing this means you dont have to plan ahead to leave room for labels. All you need to do is put a number next to the location you want to name, then write the name into your naming table, indexing the number you used. One thing this method needs of course, is a big enough empty area for the table itself. In my case, the bay looked to have plenty space for this! It helps a lot if you think of which areas you want to name, while you are in your sketching phase. Make sure you leave some empty areas where your labeling can be legible. You can also add banners and other bordering elements to make these texts stand out even more. You are welcome to add a border to your map also. It can really help tie everything together and give your map that ‘finished’ look. Check out our Accessory Packs for inspiration! The finished map with labels a simple name and a border! Common Mistakes To Avoid Overcrowding the map Avoid cluttering your map with unnecessary details. Leave some vacant spots to avoid a cluttered appearance and make the map easier to read. Focus on the main features of your settlement! There is no need to draw out every single patch of grass or tree in the forest. Look how I keep my details mostly for the edges of these areas, and for important locations. The eye needs some resting spots, don’t be afraid to leave some areas completely empty! Inconsistent scale and proportions Keep the scale consistent across your map. If one building is significantly larger or smaller than the rest, it might upset the visual harmony of your piece. A great method to use this to your advantage is using just slightly larger elements to show elevation. Things that are ‘closer’ to the ‘viewer’ or ‘camera’, will appear slightly larger because of perspective. You can use this trick for settlements that are on top of cliffs or flying high up in the sky! In my case I’ve made the castle and village using a bit of a bigger scale than the docks. Same for the cliffaces. This helps give depth to my map. If you are a complete beginner, sticking to one scale is advised however, especially if you are using a grid for your map! Neglecting functionality and realism While creativity is crucial, do not overlook functionality. Ensure that roads are properly positioned, buildings have a function, and natural resources are easily accessible. Realism makes your map more believable (and usable). This doesn’t mean that your rivers can’t flow up the hills (it’s your world after all). However, the more unfamiliar and strange your world is, the harder it will be to immerse your players or readers. Conclusion Congratulations on finishing the first chapter of our settlement mapmaking series! By now, you should have a basic idea of how to make a settlement map using pencil, ink and paper. Practice these methods, and you’ll be able to bring your imaginative worlds to life with greater depth and precision. Don’t be afraid to try things out, experiment with materials, shapes and color! I like using post-it notes to get my sketches down for some important buildings and text. And remember that pencil can always be erased (within reason). If you ‘mess up’ or you are unhappy with your final map, it’s only your first stepping stone. Get started on the next, and learn from your mistakes to make the second version that much better! Feel free to send us your creations! We are always happy to help and give feedback on how you could improve. Join our Discord Server where our lovely community is happy to give feedback! Don’t be shy and join our circle of DMs, Writers and Artists! Stay tuned for the next part of our series, where we will dive into digital methods. Starting with the simplest way: Using our Modular Tile Systems. Thanks for stopping by! Good luck on your projects! Happy Mapping! ~Blu
Welcome to BluBerrey Maps!
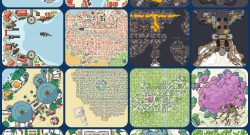
Welcome! Welcome fellow adventurers and storytellers, to our humble corner of the internet! We are absolutely thrilled to have you here, exploring our treasure trove of Tiles, Assets, Maps and PDF resources. First and foremost, we want to extend our heartfelt gratitude to each and every one of you for gracing us with your presence. Your support and enthusiasm fuel our passion for creating these resources, and it is a joy to share them with a community as amazing as ours. Thank you for being a part of our journey and for choosing us to enhance your gaming experiences. And above all, thank you for giving your honest opinions and feedback on our products. There is a good reason all of the website supports comments, reviews and votes. We value and use all feedback to better what we do every day. No time to waste! We understand the struggle all too well—the countless hours spent scouring the internet for the perfect map, or the frustration of trying to bring your envisioned city to life while juggling the demands of your busy life. The pursuit of an immersive and visually captivating map often meant investing significant time, effort, or even hefty sums of money to commission an artist. That’s precisely where the concept of modular tiles for city maps was born. We wanted to provide a solution that would empower game masters and world builders to create pretty and detailed city maps without the overwhelming time commitment or exorbitant costs. We believe that every storyteller deserves access to the tools that will help them craft the worlds and adventures they want/need. Hopefully without spending days upon days to create a single map. With our modular tile sets, we’ve carefully crafted a versatile system that allows you to build intricate cityscapes effortlessly. Gone are the days of painstakingly piecing together individual elements or relying on pre-generated maps that may not align with your unique vision. Our tiles offer an extensive range of options, from roads and buildings to parks and marketplaces, all designed to seamlessly fit together like a puzzle. By providing you with an array of modular tiles, we aim to free up your precious time so you can focus on what truly matters—the storytelling and the experiences you create for your players. No longer will you need to compromise on quality or settle for generic maps that fail to capture the essence of your world. Our modular tiles give you the creative freedom to customize and tailor your city maps to match the intricate details of your campaign setting. Modular, what does that mean? Our modular tile system offers incredible versatility. Need to modify a specific area of your city? Simply swap out tiles or rearrange them to suit your needs. Want to expand your city or create unique variations for different regions? Our modular approach allows for easy scalability and endless possibilities. We are working on expanding on making things more and more modular by every pack. Offering interconnectivity between packs and new versions, styles also. Our affordable and user-friendly modular tiles give you the power to bring your cityscapes to life and focus on the aspects of game mastering that truly ignite your passion. Thanks to the amazing support by our lovely Patreons, a big chunk of it is completely free! Your stories deserve the very best, and we are here to support you every step of the way. Let your imagination run wild and build the city of your dreams with ease, precision, and a fraction of the effort. So you want more? But we don’t stop there. Our extensive collection of assets offers you a big range of extra detail for your world. From brushes, to bustling market stalls to unique, modular building assets, these packs add depth and visual richness to your maps. They are the finishing touches that make your game come alive, inviting your players into a world teeming with wonder and possibility. And let’s not forget about our maps and PDF resources. Our expertly crafted maps transport your players to distant lands, hidden ruins, and treacherous dungeons. They serve as visual guides, sparking the imagination and guiding the flow of your narratives. Meanwhile, our PDF resources are a treasure trove of knowledge, brimming with lore, adventure hooks, and helpful tips to fuel your creative endeavors. We want you to feel empowered, inspired, and equipped to create truly remarkable gaming experiences. Our tiles, assets, and maps are carefully crafted with attention to detail, ensuring that they seamlessly integrate into your games, fostering immersion, and driving engagement. We want to be your trusted companion on your gaming adventures, igniting your creativity and fueling your passion for storytelling. One final THANK YOU! So, once again, we extend our warmest welcome to you. Take your time to explore our offerings, and remember that we are always here to assist you on your journey. If you have any questions, need guidance, or simply want to share your adventures, reach out to us! Happy gaming, and may your stories continue to captivate and inspire! With boundless gratitude, Lazlo (aka BluBerrey) and Suzanna
Dungeondraft Tutorial Video
Hey there! You can check out this video to learn all you need to know about using the assets in Dungeondraft. I’ve made it a while ago but it should still hold up, as none of the main functions or install processes changed since then. It will walk you through installation and use of both tiles and assets. Of course there are tons more little tips and tricks, but the video was long as is. I’d strongly suggest to join our discord channel to expand your knowledge on these matters. There are also loads of community based packs and modifications there that you can pick up to expand your collection of tiles and assets. You can join our discord channel here! Without further ordue, enjoy the video, I hope it helps you out!